Vintage Kitchen: Rosettes

I love searching for kitchenware at estate sales. My greatest weakness is Pyrex. (I recently found three covered casseroles—two of them with promotional patterns—for two dollars each. That was a very exciting day. But I digress.) But a close second is vintage gadgets. From hand mixers to aluminum ice trays, I adore the early technology they employ. And occasionally you'll come across a gadget you’ve never seen before—one that introduces you to a new or exciting food, or a new way of making something.
I mean, just think of the excitement someone will feel when, 50 years from now, they discover your old “zoodle” maker. Or the “egg cuber” you received as a white elephant gift.
“Oh, what a crazy, simple time 2017 was,” they’ll chuckle. “So quaint.”
So when I came across something called the Handi Hostess Kit on the third day of a recent estate sale, there was no way I was going to pass it by. From the preciously misspelled and almost-preciously sexist product name to the unspoken promise of finally hosting the dinner parties I’ve always dreamed of, I had a lot of hopes and dreams riding on this product…
whatever it was.
The Handi Hostess Kit contained “waf-l-ette and patty shell molds.” I didn’t know what that meant, but I bought the kit anyway, beguiled by what looked like tiny branding irons, and intrigued by the cup mold, which, I learned later, is called a “patty” for some reason.
The 1950s were a crazy, simple time, I suppose. So quaint.
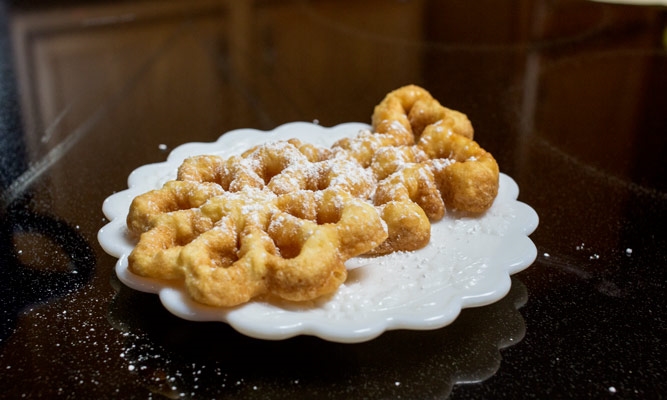
Essentially, the kit makes rosettes, a crisp pastry with Scandinavian origins. Fried on metal irons, and often topped with powdered sugar, jellies, or glazes, they’re kind of like thin, crispy funnel cakes. I’d never seen them before, apparently having lived a sad and sheltered existence up until this point. But now, thanks to my estate sale discovery, I would have the opportunity to make them myself.
And I did.

The instructions inside the box were as adorable as the product itself, not only advertising products that don’t exist anymore, but also containing modified, hand-written instructions. The temperature at which the shortening must be heated for perfect “waf-l-ettes” was clearly too hot for the handi hostess who previously owned the kit. So written in pencil, in the same handwriting every woman of a certain of a generation seems to have, are instructions to keep the ingredients at room temperature, and to keep the shortening at 300 degrees.
(The hand-written annotations of home cooks is one of my favorite parts of buying cookbooks at estate sales. You can get an idea of how much enthusiasm a person had for cooking by the look of their kitchen, and wear on the cookware being sold. But if you open up those books and find new directions penciled in—different ingredients, altered cook times—you can be confident the recipes are time tested and well-loved.)

The rosette batter is simple:
- 1 cup sifted flour
- 1 egg
- ½ cup evaporated milk
- ½ cup water
- 1 tsp. sugar
- ½ teaspoon of salt.
Mix the ingredients together, saving the flour for last. The end result should be smooth, and the consistency of cream.
As the batter comes together, heat up two pounds of shortening in a pot or dutch oven.
(Real talk: In my own kitchen, I would have just used a few glugs of canola oil, but I was trying my best to be an authentic handi hostess.)
Once the oil was hot and the batter mixed, dip the rosette iron in the oil for about 10 seconds. Shake the excess oil off, then place the iron in the batter, making sure not to submerge it completely . Then the iron is transferred back into the hot oil.

I tell my daughter that cooking is both science and magic. And these rosettes are proof of that. Once the iron hits the hot oil for a second time, the waffley batter starts to sizzle, lift away from the metal. Give the iron a little shake, and you’ll have a beautiful golden snowflake floating in your dutch oven. (Do you see the batter separating from the iron? Magic. And Science.)
Once the rosette is floating free, use a spider to flip it over, and let the other side cook for about 30 seconds before transferring it onto an absorbent paper towel
Then repeat. And repeat. And repeat. It’s such fun.
With each application, it never got old. I adored how quick and simple the process was, and how it just worked every time.
Until I got to the patty mold, that is. Unlike the rosette and butterfly irons, the batter simply would not stick to the outside of the patty cup. I adjusted the heat of the oil and the thickness of the batter, but each time I lifted the cup out of the batter, it came out clean.
But no matter, because I had these beautiful rosettes to enjoy. I sifted a healthy dose of powdered sugar on top of the crunchy confections, making sure to also get it all over the counter, as one does.
“Come enjoy these weird, crisp waffles I made,” I called to my coworkers. No one came. Perhaps a better description might have elicited more enthusiasm, but then I would have had to share.
And who wants to do that?